Table of Contents
Apple Intel Mac mini support on FreeBSD
Support status
| Model | Id | Family | Architecture | Last known working FreeBSD release | Highest bootable OS X/macOS version |
| A1176 | macmini1,1 | early 2006 | Intel | ? | Snow Leopard 10.6.8 |
| A1176 | macmini1,1 | late 2006 | Intel | ? | Snow Leopard 10.6.8 |
| A1176 | macmini2,1 | mid 2007 | Intel | 12.0-RELEASE i386** | Lion 10.7.5 |
| A1283 | macmini3,1 | early 2009 | Intel | 12.0-RELEASE amd64 | El Capitan 10.11.x |
| A1283 | macmini3,1 | late 2009 | Intel | 12.1-RELEASE amd64 | El Capitan 10.11.x |
| A1347 | macmini4,1 | mid 2010 | Intel | 13.1-RELEASE amd64 | High Sierra 10.13.x |
| A1347 | macmini5,1 | mid 2011 | Intel | 12.2-RELEASE amd64 | High Sierra 10.13.x |
| A1347 | macmini5,2 | mid 2011 | Intel | 12.2-RELEASE amd64 | High Sierra 10.13.x |
| A1347 | macmini5,3 | mid 2011 | Intel | 12.2-RELEASE amd64 | High Sierra 10.13.x |
| A1347 | macmini6,1 | late 2012 | Intel | ? | Catalina 10.15.x |
| A1347 | macmini6,2 | late 2012 | Intel | ? | Catalina 10.15.x |
| A1347 | macmini7,1 | late 2014 | Intel | 12.2-RELEASE amd64 | Monterey 12.x (current) |
| A1993 | macmini8,1 | late 2018 | Intel | ? | Monterey 12.x (current) |
** Source upgrade from 11.2-STABLE i386; 11.2-RELEASE i386 installable from CD-ROM. See Notes below.
Outstanding PRs
- https://bugs.freebsd.org/bugzilla/show_bug.cgi?id=235983 - macmini2,1 and macmini3,1 FireWire not working
- https://bugs.freebsd.org/bugzilla/show_bug.cgi?id=233098 - macmini2,1 fails to boot with lua loader error
- https://bugs.freebsd.org/bugzilla/show_bug.cgi?id=234031 - FreeBSD 12.0-RELEASE fails to boot with lua loader issue
- https://bugs.freebsd.org/bugzilla/show_bug.cgi?id=201461 - EFI Xorg issues
- https://bugs.freebsd.org/bugzilla/show_bug.cgi?id=237127 - drm2.ko module issue with drm-legacy-kmod-g20190213
- https://bugs.freebsd.org/bugzilla/show_bug.cgi?id=262456 - asmc kernel module patches for 5,1, 5,3 and 7,1 models
Installing FreeBSD as the only operating system
Macmini2,1 - FreeBSD 11.2-RELEASE i386
Before you start
You will need:
- An external USB CD/DVD drive.
- An OS X install disc (preferably the one that came with the machine or it might not boot).
Be aware
- ✔ BootROM version MM21.009A.B00 and SMC version 1.19f2 (two cases confirmed of successful installation of 11.2-RELEASE i386).
- ✘ BootROM version MM21.009A.B00 and SMC version 1.19f0 (one case confirmed of failure to detect 11.2-RELEASE i386 CD-ROM disc).
- You cannot eject the FreeBSD disc from within the FreeBSD installer as it is in use and, after a reboot, the FreeBSD installation on the internal hard disk will not be found.
- This Mac mini will not detect FreeBSD installation discs in an external CD/DVD drive
- This Mac mini will detect an OS X installation disc in an external CD/DVD/ drive
- The FreeBSD 12.0-RELEASE i386 (and stable snapshot) images do not boot - install from the 11.2-RELEASE i386 CD-ROM and source upgrade to 12.0-RELEASE. NOTE: the later 11.3-RELEASE i386 CD-ROM will not boot.
- The Boot Camp documentation for the Mac Mini 2,1 says you can load a 32 bit Vista system, but not a 64 bit version. Use i386 only.
Recipe
 These instructions will erase your computer's internal hard disk. This is not a dual-boot OS X/FreeBSD installation
- Insert the FreeBSD installation CD/DVD in the internal CD/DVD drive and turn on the Mac Mini while holding down the ALT/Option key until a Windows CD Icon appears. Choose that icon to boot into the FreeBSD installer.
- In the FreeBSD installer, make your own choices until you reach the disk setup.
- Choose Guided Disk Setup.
- Select Entire Disk.
- Choose MBR and not GPT.
- Accept the suggested partition layout or adjust for your own preferences.
- Continue with your own choices until you reach the Choose Services section. Here you should at the very least enable powerd(8) for power saving and heat reduction.
- Continue with your own choices until the installation is finished, but do not reboot yet.
- Insert the OS X installation disc into the external CD/DVD drive.
- Reboot. The system will shutdown gracefully but fail to reboot, so you will need to power the machine off manually.
- Power on the machine while holding down the ALT/Option key - you will eventually be presented with three boot options: The OS X installation disc, a Windows disc (FreeBSD disc) and a Windows hard disk (FreeBSD). Choose the OS X disc.
- From the OS X installation menu, choose Utilities → Terminal.
- Eject the FreeBSD disc using
diskutil eject /dev/disk1in the terminal.
- In the terminal, bless the FreeBSD hard disk partition using the following command:
bless --device /dev/disk0s1 --setBoot --legacy
- In the terminal, reboot with the command
reboot
The system should reboot into the FreeBSD installation on the hard disk. If it chooses the OS X installation disc, power off, power on while holding the ALT/Option key, choose the Windows hard disk option which will boot into FreeBSD. After logging into FreeBSD, camcontrol eject cd1 will eject the OS X installation disc.
Macmini3,1 - FreeBSD 12.0-RELEASE amd64
Before you start
You will need:
- A memory stick to hold the FreeBSD image (FreeBSD-12.0-RELEASE-amd64-memstick.img)
- An OS X install disc (preferably the one that came with the machine or it might not boot).
Recipe
These instructions will erase your computer's internal hard disk. This is not a dual-boot OS X/FreeBSD installation
- Insert the USB memory stick and turn on the Mac Mini while holding down the ALT/Option key until a Windows USB Icon appears. Choose that icon to boot into the FreeBSD installer.
- In the FreeBSD installer, make your own choices until you reach Distributions to Install - here make sure to select the
srccomponent as you will need to rebuild the kernel later to get wireless working.
- Continue making your own choices until you reach the disk setup.
- Choose Guided Disk Setup.
- Select Entire Disk.
- Choose GPT.
- Accept the suggested partition layout or adjust for your own preferences.
- Continue with your own choices until you reach the Choose Services section. Here you should at the very least enable powerd(8) for power saving and heat reduction.
- Continue with your own choices until the installation is finished, but do not reboot yet. Note: the BCM4321 wireless device will not be found in network configuration – see below.
- Remove the USB memory stick.
- Insert the OS X installation disc into the internal CD/DVD drive.
- Reboot while holding down the ALT/Option key - you will eventually be presented with two boot options: The OS X installation disc and an EFI hard disk (FreeBSD). Choose the OS X disc.
- From the OS X installation menu, choose Utilities → Terminal.
- In the terminal, bless the FreeBSD boot file using the following commands:
mount -t msdos /dev/disk0s1 /Volumes
bless --mount /Volumes --setBoot --file /Volumes/efi/boot/BOOTX64.efi --shortform
umount /Volumes
reboot
The system should reboot into the FreeBSD installation on the hard disk. If it chooses the OS X installation disc, power off, power on while holding the ALT/Option key, choose the Windows hard disk option which will boot into FreeBSD. After logging into FreeBSD as root, camcontrol eject cd0 will eject the OS X installation disc. Reboot and it should startup from FreeBSD on the hard disk.
Macmini4,1 through Macmini7,1 - FreeBSD 12.0-RELEASE amd64
Before you start
You will need:
- A memory stick to hold the FreeBSD image (FreeBSD-12.0-RELEASE-amd64-memstick.img)
- A memory stick to hold a bootable OS X/macOS installation image for a version of OS X/macOS that supports your computer (see above)
Recipe
These instructions will erase your computer's internal hard disk. This is not a dual-boot OS X/FreeBSD installation
- Insert the USB memory stick and turn on the Mac Mini while holding down the ALT/Option key until a Windows USB Icon appears. Choose that icon to boot into the FreeBSD installer.
- In the FreeBSD installer, make your own choices until you reach the disk setup.
- Choose Guided Disk Setup.
- Select Entire Disk.
- Choose GPT.
- Accept the suggested partition layout or adjust for your own preferences.
- Continue with your own choices until you reach the Choose Services section. Here you should at the very least enable powerd(8) for power saving and heat reduction.
- Continue with your own choices until the installation is finished, but do not reboot yet.
- Remove the FreeBSD installation USB memory stick.
- Insert the OS X/macOS installation USB memory stick.
- Reboot while holding down the ALT/Option key - you will eventually be presented with two boot options: The OS X/macOS installation USB memory stick and an EFI hard disk (FreeBSD). Choose the OS X/macOS installation option.
- From the OS X/macOS installation menu, choose Utilities → Terminal.
- In the terminal, bless the FreeBSD boot file using the following commands:
mount -t msdos /dev/disk0s1 /Volumes
bless --mount /Volumes --setBoot --file /Volumes/efi/boot/BOOTX64.efi --shortform
umount /Volumes
reboot
The system should reboot into the FreeBSD installation on the hard disk. If it chooses the OS X installation USB memory stick, power off, power on while holding the ALT/Option key, choose the EFI hard disk option which will boot into FreeBSD and it should startup from FreeBSD on the hard disk.
Consult the Model specific information for further advice.
Macmini8,1 - FreeBSD 12.0-RELEASE amd64
Be aware
FreeBSD cannot be installed on the 2018 Mac mini's internal SSD because there is no FreeBSD driver for the Apple T2 chip which contains among other things the SSD controller, so FreeBSD cannot detect the internal SSD.
It may be possible to install FreeBSD onto an externally attached hard disk/SSD if you:
- Use the macOS Startup Security Utility which can only be accessed by booting into macOS Recovery (so make sure you do this before attempting to install FreeBSD).
- Change the “Secure Boot” option from the default “Full Security” to “No Security”.
- Change the “External Boot” option from the default “Disallow booting from external media” to “Allow booting from external media”.
However, I had no success. The USB memory stick image (also tried the ISO image dd'd to a USB memory stick, and a CD drive image) gets as far as the “BOOTING” message and the monitor loses the video signal. This may be related to the ongoing 2018 Mac mini monitor issues (see the Apple Forum).
Google suggests that some Linux distributions do boot (but, of course, cannot install on the internal SSD drive), so there may be some hope.
Model specific information
Mac mini 1,1
- ✔ asmc(4) Apple System Management Controller (SMC)
Mac mini 2,1
- ✔ asmc(4) Apple System Management Controller (SMC) [supported in 11-STABLE and 12-STABLE as of 7 March 2019]
- ✔ msk(4) Marvell/SysKonnect Yukon II Gigabit Ethernet adapter driver
- ✔ ath(4) Qualcomm Atheros AR5413 PCIe wireless network driver (802.11 a/b/g)
- ✔ sound(4) and snd_hda(4) Intel High Definition Audio bridge device driver (Sigmatel STAC9221)
- (?) aird(1) IR daemon to control your computer with an Apple Remote (
/usr/ports/sysutils/aird) - (?) ng_ubt(4) Driver for Bluetooth USB devices
- ✔ Intel 945GM video driver (
/usr/ports/graphics/drm-legacy-kmod-g20190213) - but see Notes below.
Notes:
- FreeBSD installation CD-ROM images after FreeBSD 11.2-RELEASE i386 will not boot.
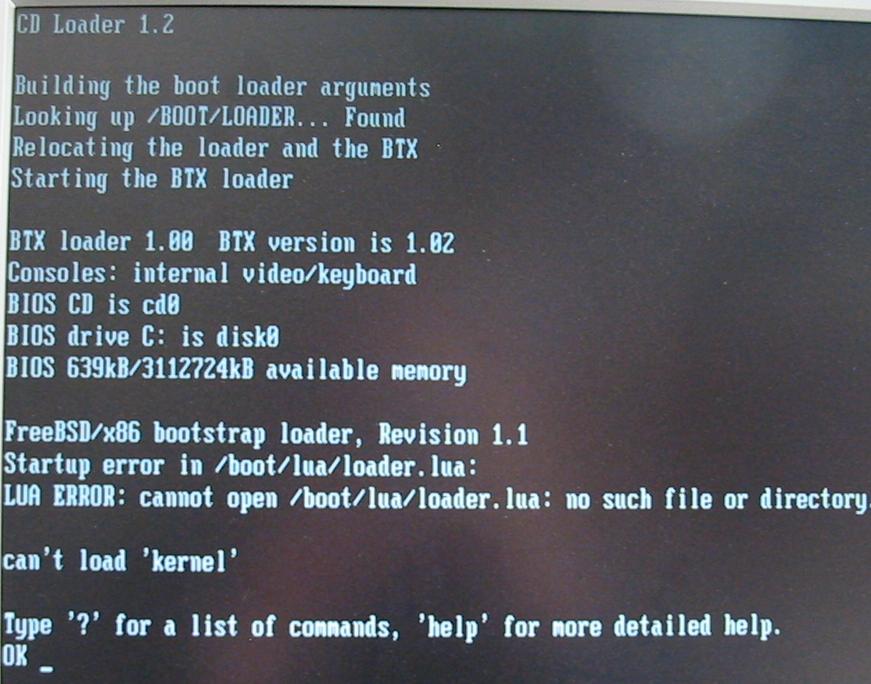
- 12-STABLE i386 snapshot ISO of 20190207 installer fails to boot with a lua startup error: 12STABLEmacmini21.jpg.
- 11.2-RELEASE i386, 11.2-STABLE i386 r344113, 12.0-STABLE i386 r345906 fails to reboot via
rebootorshutdown -r nowand hangs after syncing disks and detaching USB peripherals butreboot -qdoes successfully reboot the system after syncing the disk. - 11.2-RELEASE i386, 11.2-STABLE i386 r344113, 12-STABLE i386 r345906 unable to access FreeBSD boot menu - no keyboard access until system has booted.
- Cannot boot a USB memory stick image (An Apple restriction on machines with an internal optical drive).
- FireWire log (non-working): fw_macmini21.log
- After installing drm-legacy-kmod-g20190213:
- Add
kld_list="/boot/modules/drm2.ko /boot/modules/915kms.ko"to/etc/rc.conf - Rename/delete the base system
/boot/kernel/drm2.komodule to stop the system loading the wrong module (see PR)
Mac mini 3,1
- ✔ asmc(4) Apple System Management Controller (SMC)
- ✔ nfe(4) NVIDIA nForce MCP Ethernet driver
- ✔ bwn(4) Broadcom BCM4321 IEEE 802.11b/g wireless network driver (802.11 a/b/g/n)
- ✔ sound(4) and snd_hda(4) Intel High Definition Audio bridge device driver
- (?) aird(1) IR daemon to control your computer with an Apple Remote (
/usr/ports/sysutils/aird) - ✔ ng_ubt(4) Driver for Bluetooth USB devices
- ✔ nvidia-driver-340 Xorg driver for nVidia GeForce 9400
Notes:
- To get sound working via headphones/external speakers, after a reboot, add this to /etc/sysctl.conf
# Below to set sound to rear analog headphones on Mac mini
dev.hdaa.0.gpio_config="0=set 1=set"
hw.snd.default_unit=2
- To get the wireless bwn(4) device working in 12.0-RELEASE amd64, you need to:
- Compile a new kernel (see the Handbook) with the following additional options:
options BWN_DEBUG
options BWN_GPL_PHY
- Install the bwn-firmware-kmod port.
- Add the following to
/boot/loader.conf.local:
if_bwn_load="YES"
bwn_v4_ucode_load="YES"
bwn_v4_n_ucode_load="YES"
- Xorg issues (EFI installations only)
- Exiting from Xorg(1) will leave you with a blank, black screen and you will not be able to switch to another terminal with ALT-n that is not blank and black. You can, however, “type blind” and reboot.
- Trying to CTRL-ALT-n from within Xorg will result in blank. black screens, but you can get back to the Xorg's virtual terminal which is still active.
- See this longstanding PR
- FireWire log (non-working) fw_macmini31.log
Mac mini 4,1
- ✔ asmc(4) Apple System Management Controller (SMC)
- ✔ bge(4) Broadcom NetXtreme BCM57765 Gigabit Ethernet PCIe Ethernet driver
Notes:
- To get bge(4) working, add the following to
/boot/loader.conf:
hw.pci.enable_msi="0"
Mac mini 5,1
- ✔ asmc(4) Apple System Management Controller (SMC) [see my patches at https://bugs.freebsd.org/bugzilla/show_bug.cgi?id=262456]
- ✔ bge(4) Broadcom NetXtreme BCM57765 Gigabit Ethernet PCIe Ethernet driver
- ✘ bwn(4) Broadcom BCM4331 802.11n Dual-Band Wireless [support in progress]
- ✔ sdhci(4) PCI SD Host Controller bridge driver (BCM57765/57785 SDXC/MMC Card Reader)
- (?) aird(1) IR daemon to control your computer with an Apple Remote (
/usr/ports/sysutils/aird). - ✔ ng_ubt(4) Driver for Bluetooth USB devices
Notes:
- Intel HD Graphics 3000 processor with 288MB of DDR3 SDRAM shared with main memory
Mac mini 5,2
- ✔ asmc(4) Apple System Management Controller (SMC)
- ✔ bge(4) Broadcom NetXtreme BCM57765 Gigabit Ethernet PCIe Ethernet driver
- ✘ bwn(4) Broadcom BCM4331 802.11n Dual-Band Wireless [support in progress]
- ✔ sdhci(4) PCI SD Host Controller bridge driver (BCM57765/57785 SDXC/MMC Card Reader)
- (?) aird(1) IR daemon to control your computer with an Apple Remote (
/usr/ports/sysutils/aird) - ✔ ng_ubt(4) Driver for Bluetooth USB devices
Notes:
- AMD Radeon HD 6630M graphics processor with 256MB of GDDR5 memory
- xorg - no joy with Radeon graphics drivers, but using the scfb video driver for wsdisplay framebuffer works:
Section "Device"
     Identifier "card 0"
     Driver      "scfb"
EndSection
Mac mini 5,3
- ✔ asmc(4) Apple System Management Controller (SMC) [see my patches at https://bugs.freebsd.org/bugzilla/show_bug.cgi?id=262456]
- ✔ bge(4) Broadcom NetXtreme BCM57765 Gigabit Ethernet PCIe Ethernet driver
- ✘ bwn(4) Broadcom BCM4331 802.11n Dual-Band Wireless [support in progress]
- ✔ sdhci(4) PCI SD Host Controller bridge driver (BCM57765/57785 SDXC/MMC Card Reader)
- (?) aird(1) IR daemon to control your computer with an Apple Remote (
/usr/ports/sysutils/aird) - ✔ ng_ubt(4) Driver for Bluetooth USB devices
Notes:
- Intel HD Graphics 3000 processor with 288MB of DDR3 SDRAM shared with main memory
Mac mini 6,1
Mac mini 6,2
Mac mini 7,1
- ✔ asmc(4) Apple System Management Controller (SMC) [see my patches at https://bugs.freebsd.org/bugzilla/show_bug.cgi?id=262456]
- ✔ ng_ubt(4) Driver for Bluetooth USB devices
Mac mini 8,1
- ✘ asmc(4) Apple System Management Controller (SMC) [not supported yet]
Notes:
- No FreeBSD driver available for the internal SSD which uses Apple's T2 security chip. The T2 integrates several controllers found in other Mac computers such as the System Management Controller, image signal processor, audio controller, and SSD controller. The SSD is encrypted using a hardware-accelerated AES engine built into the T2 chip. This encryption is performed with 256-bit keys tied to a unique identifier within the T2 chip.
asmc notes
asmc(4) is the FreeBSD device driver for the Apple System Management Controller (SMC). The variables related to the SMC are exported via sysctl(3) under the device tree dev.asmc and, for the Mac mini, report fan speeds and temperature sensor readings.
- Load the module by adding
asmc_load="YES"to/boot/loader.conf.localor adddevice asmcto your kernel configuration file and rebuild.
- To set minimum fan speed to eg 2200 RPM, add
dev.asmc.0.fan.0.minspeed=2200to /etc/sysctl.conf which will work after a reboot; or set it on the command line for instant resultssysctl dev.asmc.0.fan.0.minspeed=2200.